6. Examples
In this section, some applications of the toy model are presented. Don’t hesitate to send me your applications to complete this section.
6.1. Force Meso-NH by analytical field
This example corresponds to the ktest 013_Iroise_OASIS_coupling. It allows to test the OASIS implementation inside Meso-NH. The coupled simulation corresponds to an idealized case in the Iroise Sea. The simulation lasts 360 seconds and the fields are exchanged every 60 seconds. Only two fields are exchanged. 10m u-wind speed is send by Meso-NH to the toy model using bilinear interpolation method (SCRIPR BILINEAR LR SCALAR LATLON 1). Toy model model send to Meso-NH an analytical field based on a sinusoidal function using distance weight interpolation method using 4 neighboors (SCRIPR DISTWGT LR SCALAR LATLON 1 4).
In the ktest MY_RUN/KTEST/013_Iroise_OASIS_coupling/ the following structure has been chosen to separate the different steps as much as possible :
├── 1_input_mnh   : preparation of the input files for Meso-NH model
├── 2_input_toy   : preparation of the input files for toy model
├── 3_input_oasis : preparation of the input file  for OASIS
└── A_cpl_mnh_toy : simulation's directory
To launch the KTEST:
./run_013_Iroise_OASIS_coupling
Note
It is also possible to execute step by step by going to each folder and executing the run_* scripts.
6.1.1. Preparation of the input files for Meso-NH model
To prepare the input files for Meso-NH model, go to 1_input_mnh directory. PREP_PGD and PREP_IDEAL_CASE steps are identical to an uncoupled simulation (without OASIS).
Run the following script to create the PGD and PREP_IDEAL_CASE files :
run_prep_mesonh_xyz
Note
It could be necessary to rearrange the cover by suppressing town points using :
&NAM_PGD_ARRANGE_COVER LWATER_TO_NATURE = .FALSE., LTOWN_TO_ROCK = .TRUE. /
At the end of run_prep_mesonh_xyz script, a rstrt_MNH.nc file is generated using the python script create_restart_file_from_PREP_IDEAL_CASE.py. This file contains the fields from the PREP_IDEAL_CASE file that will be sent to the toy model. It is essential to OASIS in order to start the coupled simulation.
Note
The namelist EXSEG1.nam is also present in the 1_input_mnh directory. This namelist is used in the A_cpl_mnh_toy directory.
6.1.2. Preparation of the input files for toy model
To prepare the input files for toy model, go to 2_input_toy directory. A python script create_grid_and_restart_files_for_TOY_from_etopo2.py is used to generate a grid file read by the toy model from the etopo2.nc file. You need to enter the extension of your domain at the beginning of this script :
lon_domain = [-6.2, -4.0]
lat_domain = [47.0, 49.5]
Run the following script to initialise the toy:
run_prep_toy
This scrip create two files, the file grid_toy_model.nc contains the grid for the toy model and the file rst_T.nc contains the field to send to OASIS at the first time step.
Note
This script can also be used to generate a grid from a Meso-NH output, so that the toy model can have the same grid as Meso-NH.
This folder contains the namelists TOYNAMELIST.nam, which will be used in the A_cpl_mnh_toy directory. Go to the section about Toy model for more information.
6.1.3. Preparation of the input files for OASIS
To prepare the input files for toy model, go to 3_input_oasis directory. This folder contains the namelist for OASIS called namcouple. Information relating to the coupling is contained within this namelist. Go to the section about OASIS coupler for more information.
6.1.4. Summary of necessary files for the coupled simulation
Model/Coupler |
List of necessary files |
|---|---|
OASIS |
namcouple |
TOY |
TOYNAMELIST.nam, grid_toy_model.nc, rstrt_TOY.nc |
Meso-NH |
EXSEG1.nam, PGD and PREP_IDEAL_CASE files, rstrt_MNH.nc |
6.1.5. Launch the coupled simulation
To launch the simulation go to A_cpl_mnh_toy directory and do :
run_mesonh_xyz
Note
This simulation take less than 20 seconds on a Linux laptot with a processor Intel Core i7 at 2.8 Ghz.
This script is described below :
#!/bin/bash

echo '--------------------------------------'
echo '    Run Meso-NH coupling              '
echo '--------------------------------------'

export PATH_EXETOY=${SRC_MESONH}/src/LIB/toy_1.0/

#~~~~~ MESONH
ln -sf ../1_input_mnh/IROISE_5KM* .
ln -sf ../1_input_mnh/EXSEG1.nam .
cp     ../1_input_mnh/rstrt_MNH.nc rst_A.nc

#~~~~~ TOY
ln -sf ../2_input_toy/grid_toy_model.nc .
ln -sf ../2_input_toy/TOYNAMELIST.nam .
cp     ../2_input_toy/rstrt_TOY.nc rst_T.nc

#~~~~~ OASIS
ln -fs ../3_input_oasis/namcouple .

# ------------------------------------------
time mpirun -np 1 $PATH_EXETOY/toy_model : -np 1 MESONH${XYZ}
# ------------------------------------------
Note
Following files are created during the simulation :
outputs for OASIS: debug.01.000000, debug.02.000000, nout.000000, grids.nc, masks.nc, areas.nc, MNH__U10_mesonh_01.nc, MNH__CHA_mesonh_02.nc, VARRCV01_toyexe_01.nc, VARSIN01_toyexe_02.nc, rmp_ssea_to_toyt_BILINEAR.nc, rmp_toyt_to_ssea_DISTWGT_4.nc
outputs for TOY: OUTPUT_TOY.txt
outputs for Meso-NH/SurfEX: OUTPUT_LISTING0, OUTPUT_LISTING1, IROIS.1.00-01.000.des, IROIS.1.00-01.000.nc, IROIS.1.00-01.001.des, IROIS.1.00-01.001.nc
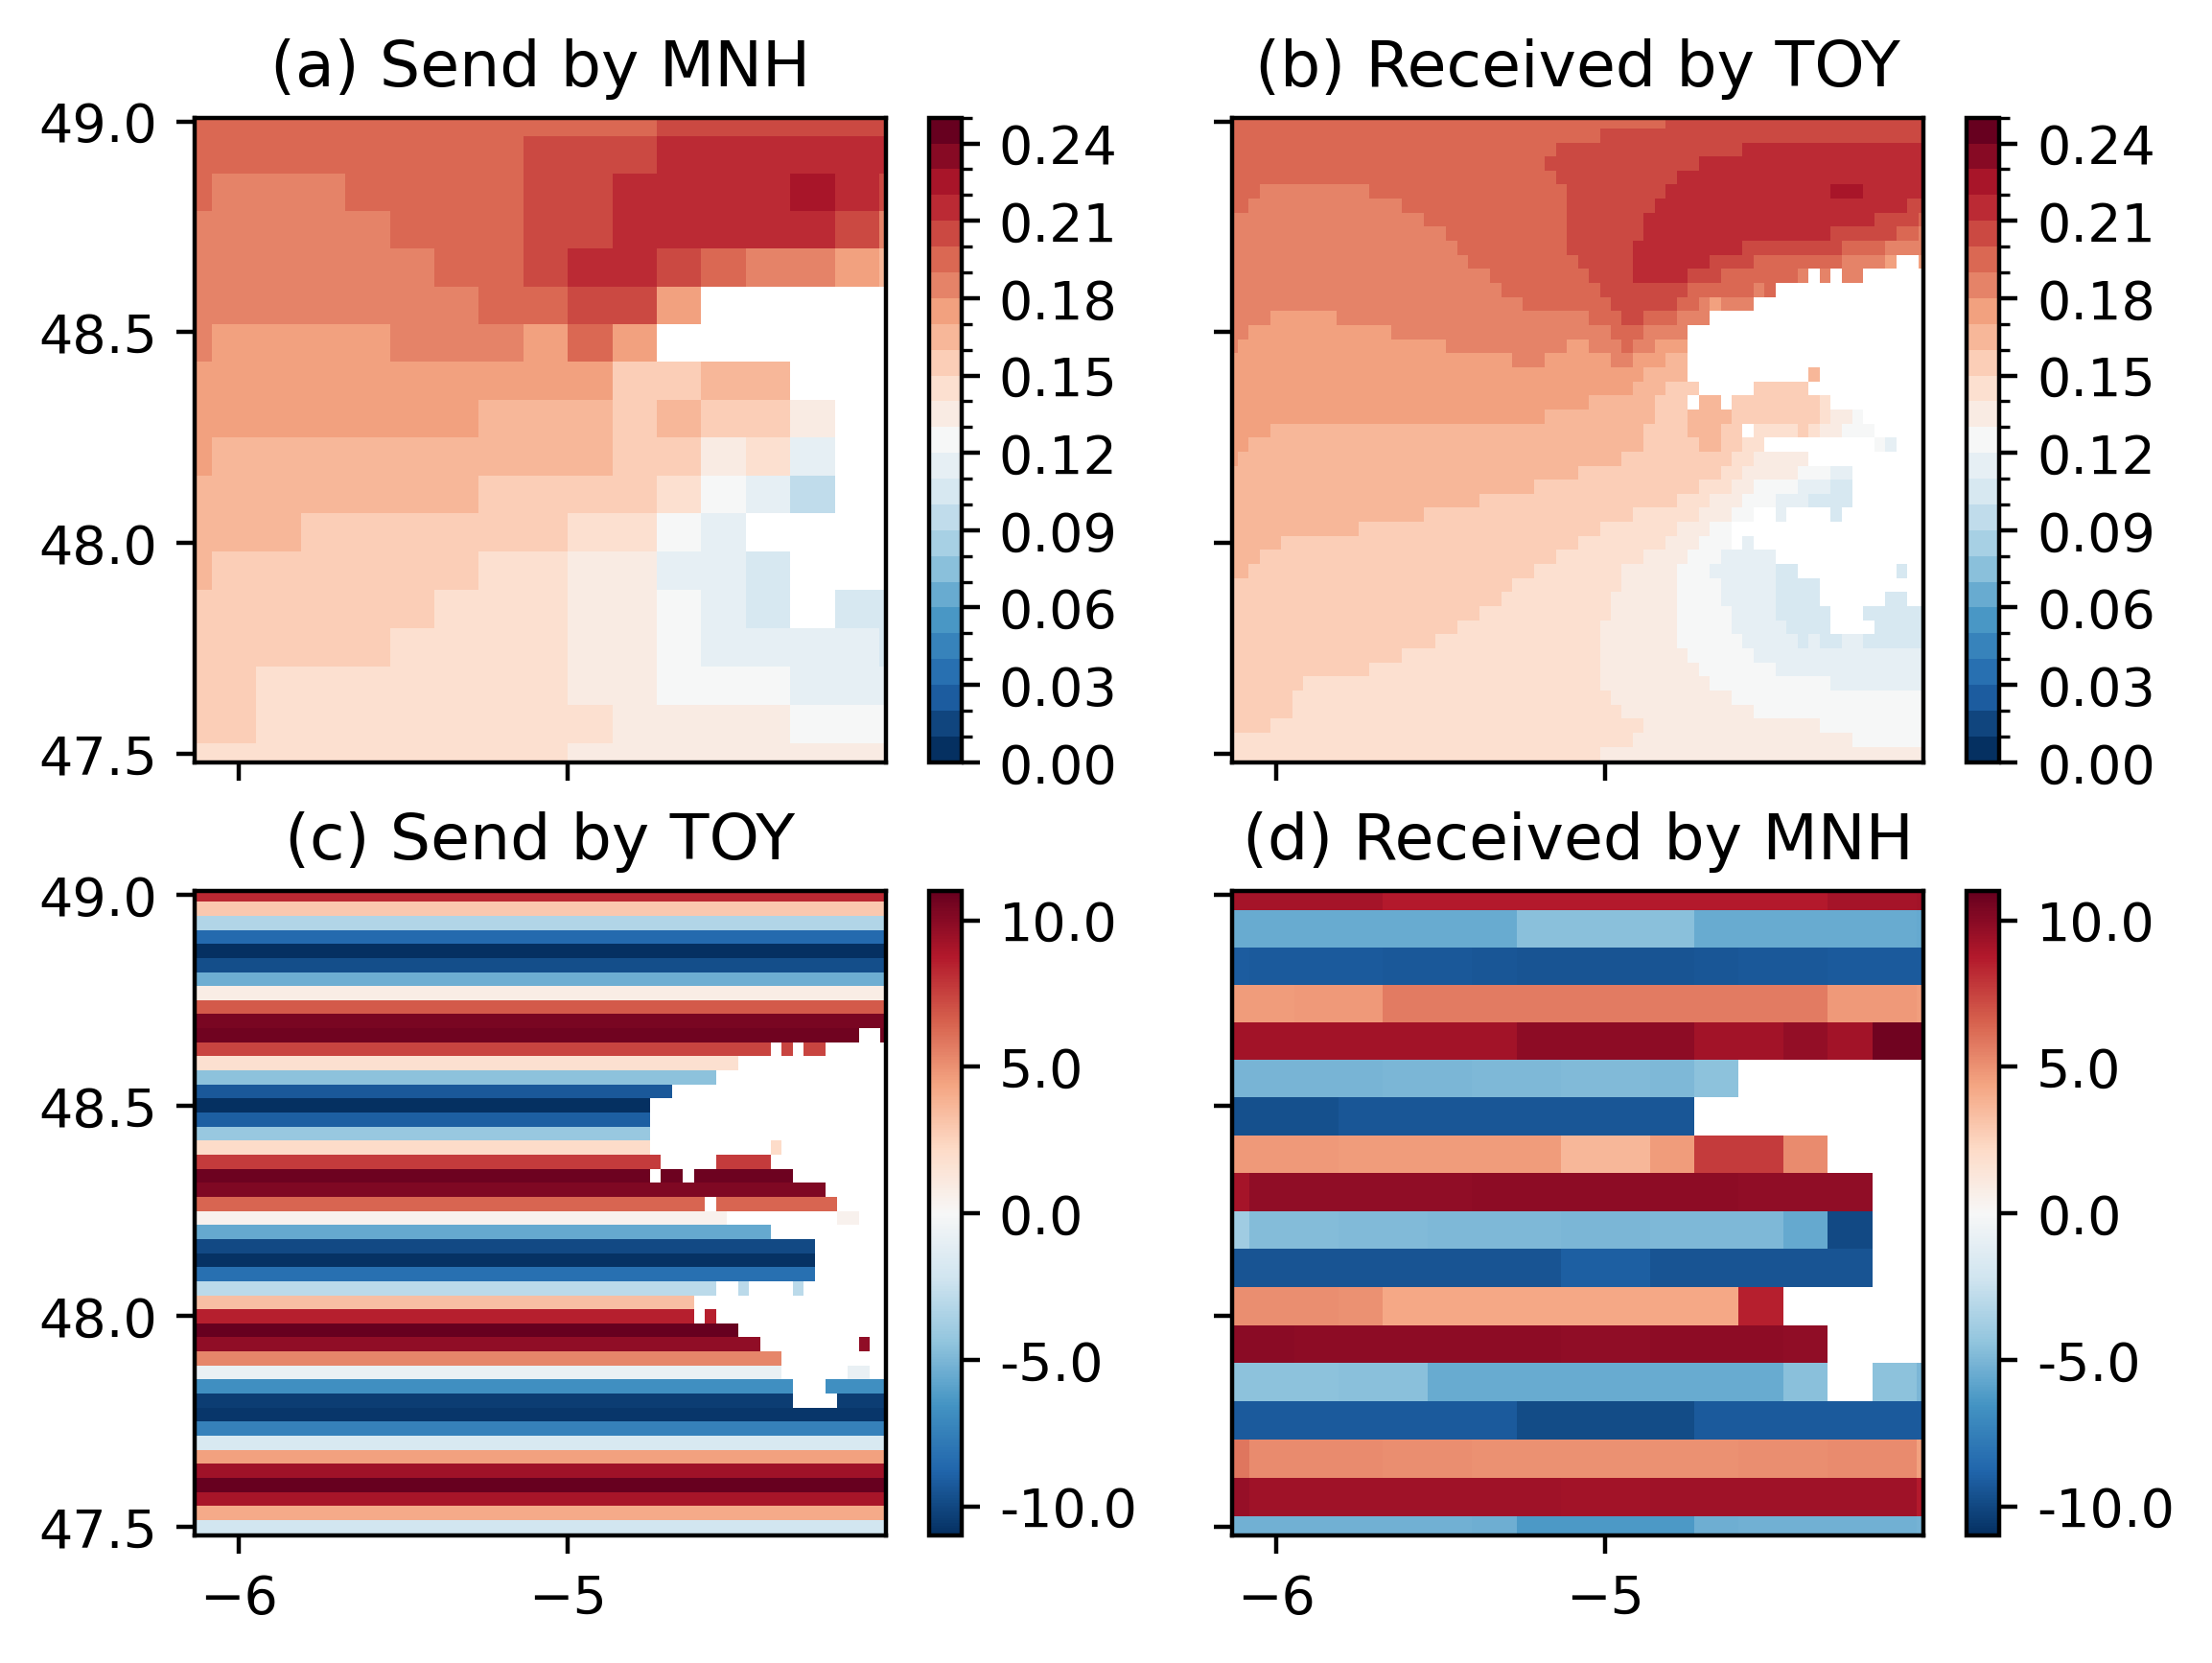
And this figure needs to be plotted (MY_RUN/KTEST/013_Iroise_OASIS_coupling/A_cpl_mnh_toy/U10_CHA/U10_CHA.png):

The first line corresponds to the 10m u-wind speed sent from Meso-NH (a) to the toy model (b). The second line corresponds to the Charnock coefficient sent by the toy model (c) to Meso-NH (d). Differences are due to the interpolation method (SCRIPR BILINEAR LR SCALAR LATLON 1 for first line, SCRIPR DISTWGT LR SCALAR LATLON 1 4 for second line).
6.2. Force Meso-NH by SST from CMEMS
In this example based on Force Meso-NH by analytical field, the toy send SST from CMEMS to Meso-NH. This kind of simulation is usually used when we want to force Meso-NH by an interactive SST and if we want to compare with coupled simulation with a 3d oceanic model.
You can copy/paste the structure of the Force Meso-NH by analytical field example :
├── 1_input_mnh   : preparation of the input files for Meso-NH model
├── 2_input_toy   : preparation of the input files for toy model
├── 3_input_oasis : preparation of the input file  for OASIS
└── A_cpl_mnh_toy : simulation's directory
6.2.1. Preparation of the input files for Meso-NH model
Same as Force Meso-NH by analytical field but you need now to use in EXSEG1.nam :
&NAM_SFX_SEA_CPL XTSTEP_CPL_SEA  =  60.0,
                 CSEA_FWSU       = 'MNH_TAUX',
                 CSEA_FWSV       = '        ',
                 CSEA_HEAT       = '        ',
                 CSEA_SNET       = '        ',
                 CSEA_WIND       = '        ',
                 CSEA_FWSM       = '        ',
                 CSEA_EVAP       = '        ',
                 CSEA_RAIN       = '        ',
                 CSEA_SNOW       = '        ',
                 CSEA_WATF       = '        ',
                 CSEA_PRES       = '        ',
                 CSEA_SST        = 'MNH__SST',
                 CSEA_UCU        = '        ',
                 CSEA_VCU        = '        ' /
and put XTSTEP_CPL_WAVE=-1.0 to not activate coupling with wave model.
6.2.2. Preparation of the input files for toy model
To prepare the input files for toy model, go to 2_input_toy directory. A python script create_grid_and_restart_files_for_TOY_from_CMEMS_IBI.py is used to generate a netcdf files for the toy model from the CMEMS IBI file. But before using this script you need to extract SST file from CMEMS server. For that purpose, you can use following command :
python -m motuclient --motu https://nrt.cmems-du.eu/motu-web/Motu                 \
                  --user <USER>    --pwd <PASSWORD>                             \
                  --service-id IBI_ANALYSISFORECAST_PHY_005_001-TDS            \
                  --product-id cmems_mod_ibi_phy_anfc_0.027deg-2D_PT1H-m        \
                  --longitude-min -6.2 --longitude-max -4.0 \
                  --latitude-min 47.0 --latitude-max 49.5 \
                  --date-min "2023-09-01 00:00:00" --date-max "2023-09-15 00:00:00" \
                  --variable thetao --variable uo --variable vo \
                  --out-dir ${PWD} \
                  --out-name sst_currents_20230901_20230915_IBI.nc
Then, you need to enter the extension of your domain at the beginning of the script create_grid_and_restart_files_for_TOY_from_CMEMS_IBI.py :
lon_domain = [-6.2, -4.0]
lat_domain = [47.0, 49.5]
Then you have to change the name of the python script in script run_prep_toy and do:
./run_prep_toy
This scrip creates three files (1) grid_toy_model.nc which contains the grid for the toy model, (2) rst_T.nc which contains the field to send to OASIS at the first time step and (3) forcing_for_toy.nc which contains hourly SST from CMEMS server with new variables names.
In TOYNAMELIST.nam you need to change following namelist :
&nam_fct_send type_send='files',
              forcing_file_name='forcing_for_toy.nc' /

&nam_send_fields nsend_fields=1,
                 name_send_fields(1)='TOY__SST' /
Note
This script can also be used to generate a grid from a Meso-NH output, so that the toy model can have the same grid as Meso-NH.
This folder contains the namelists TOYNAMELIST.nam, which will be used in the A_cpl_mnh_toy directory. Go to the section about Toy model for more information.
6.2.3. Preparation of the input files for OASIS
Same as Force Meso-NH by analytical field but you need to use for the exchanged fields :
#                     -----------------------------------------
#                        MESONH (mesonh) ==> TOY (toyexe)
#                     -----------------------------------------
#
#~~~~~~~~~~~
# Field 1 :
#~~~~~~~~~~~
MNH_TAUX VARRCV01 1 60 1 rst_A.nc EXPOUT
20 20 80 91 ssea toyt LAG=+10
R  0  R  0
SCRIPR
BILINEAR LR SCALAR LATLON 1
#
#                     ------------------------------------------
#                        TOY (toyexe) ==> MESONH (mesonh)
#                     ------------------------------------------
#
#~~~~~~~~~~~
# Field 2 :
#~~~~~~~~~~~
TOY__SST MNH__SST 1 60 2 rst_T.nc EXPOUT
80 91 20 20 toyt ssea LAG=+60
R  0  R  0
BLASNEW SCRIPR
1.0 1
CONSTANT 273.15
DISTWGT LR SCALAR LATLON 1 4
6.2.4. Summary of necessary files for the coupled simulation
Model/Coupler |
List of necessary files |
|---|---|
OASIS |
namcouple |
TOY |
TOYNAMELIST.nam, grid_toy_model.nc, forcing_for_toy.nc, rstrt_TOY.nc |
Meso-NH |
EXSEG1.nam, PGD and PREP_IDEAL_CASE files, rstrt_MNH.nc |
6.2.5. Launch the coupled simulation
To launch the simulation go to A_cpl_mnh_toy directory and do :
run_mesonh_xyz
Note
This simulation take less than 20 seconds on a Linux laptot with a processor Intel Core i7 at 2.8 Ghz.
This script is described below :
#!/bin/bash

echo '--------------------------------------'
echo '    Run Meso-NH coupling              '
echo '--------------------------------------'

export PATH_EXETOY=${SRC_MESONH}/src/LIB/toy_1.0/

#~~~~~ MESONH
ln -sf ../1_input_mnh/IROISE_5KM* .
ln -sf ../1_input_mnh/EXSEG1.nam .
cp     ../1_input_mnh/rstrt_MNH.nc rst_A.nc

#~~~~~ TOY
ln -sf ../2_input_toy/grid_toy_model.nc .
ln -sf ../2_input_toy/forcing_for_toy.nc .
ln -sf ../2_input_toy/TOYNAMELIST.nam .
cp     ../2_input_toy/rstrt_TOY.nc rst_T.nc

#~~~~~ OASIS
ln -fs ../3_input_oasis/namcouple .

# ------------------------------------------
time mpirun -np 1 $PATH_EXETOY/toy_model : -np 1 MESONH${XYZ}
# ------------------------------------------
Note
Following files are created during the simulation :
outputs for OASIS: debug.01.000000, debug.02.000000, nout.000000, grids.nc, masks.nc, areas.nc, MNH_TAUX_mesonh_01.nc, MNH__SST_mesonh_02.nc, VARRCV01_toyexe_01.nc, TOY__SST_toyexe_02.nc, rmp_ssea_to_toyt_BILINEAR.nc, rmp_toyt_to_ssea_DISTWGT_4.nc
outputs for TOY: OUTPUT_TOY.txt
outputs for Meso-NH/SurfEX: OUTPUT_LISTING0, OUTPUT_LISTING1, IROIS.1.00-01.000.des, IROIS.1.00-01.000.nc, IROIS.1.00-01.001.des, IROIS.1.00-01.001.nc
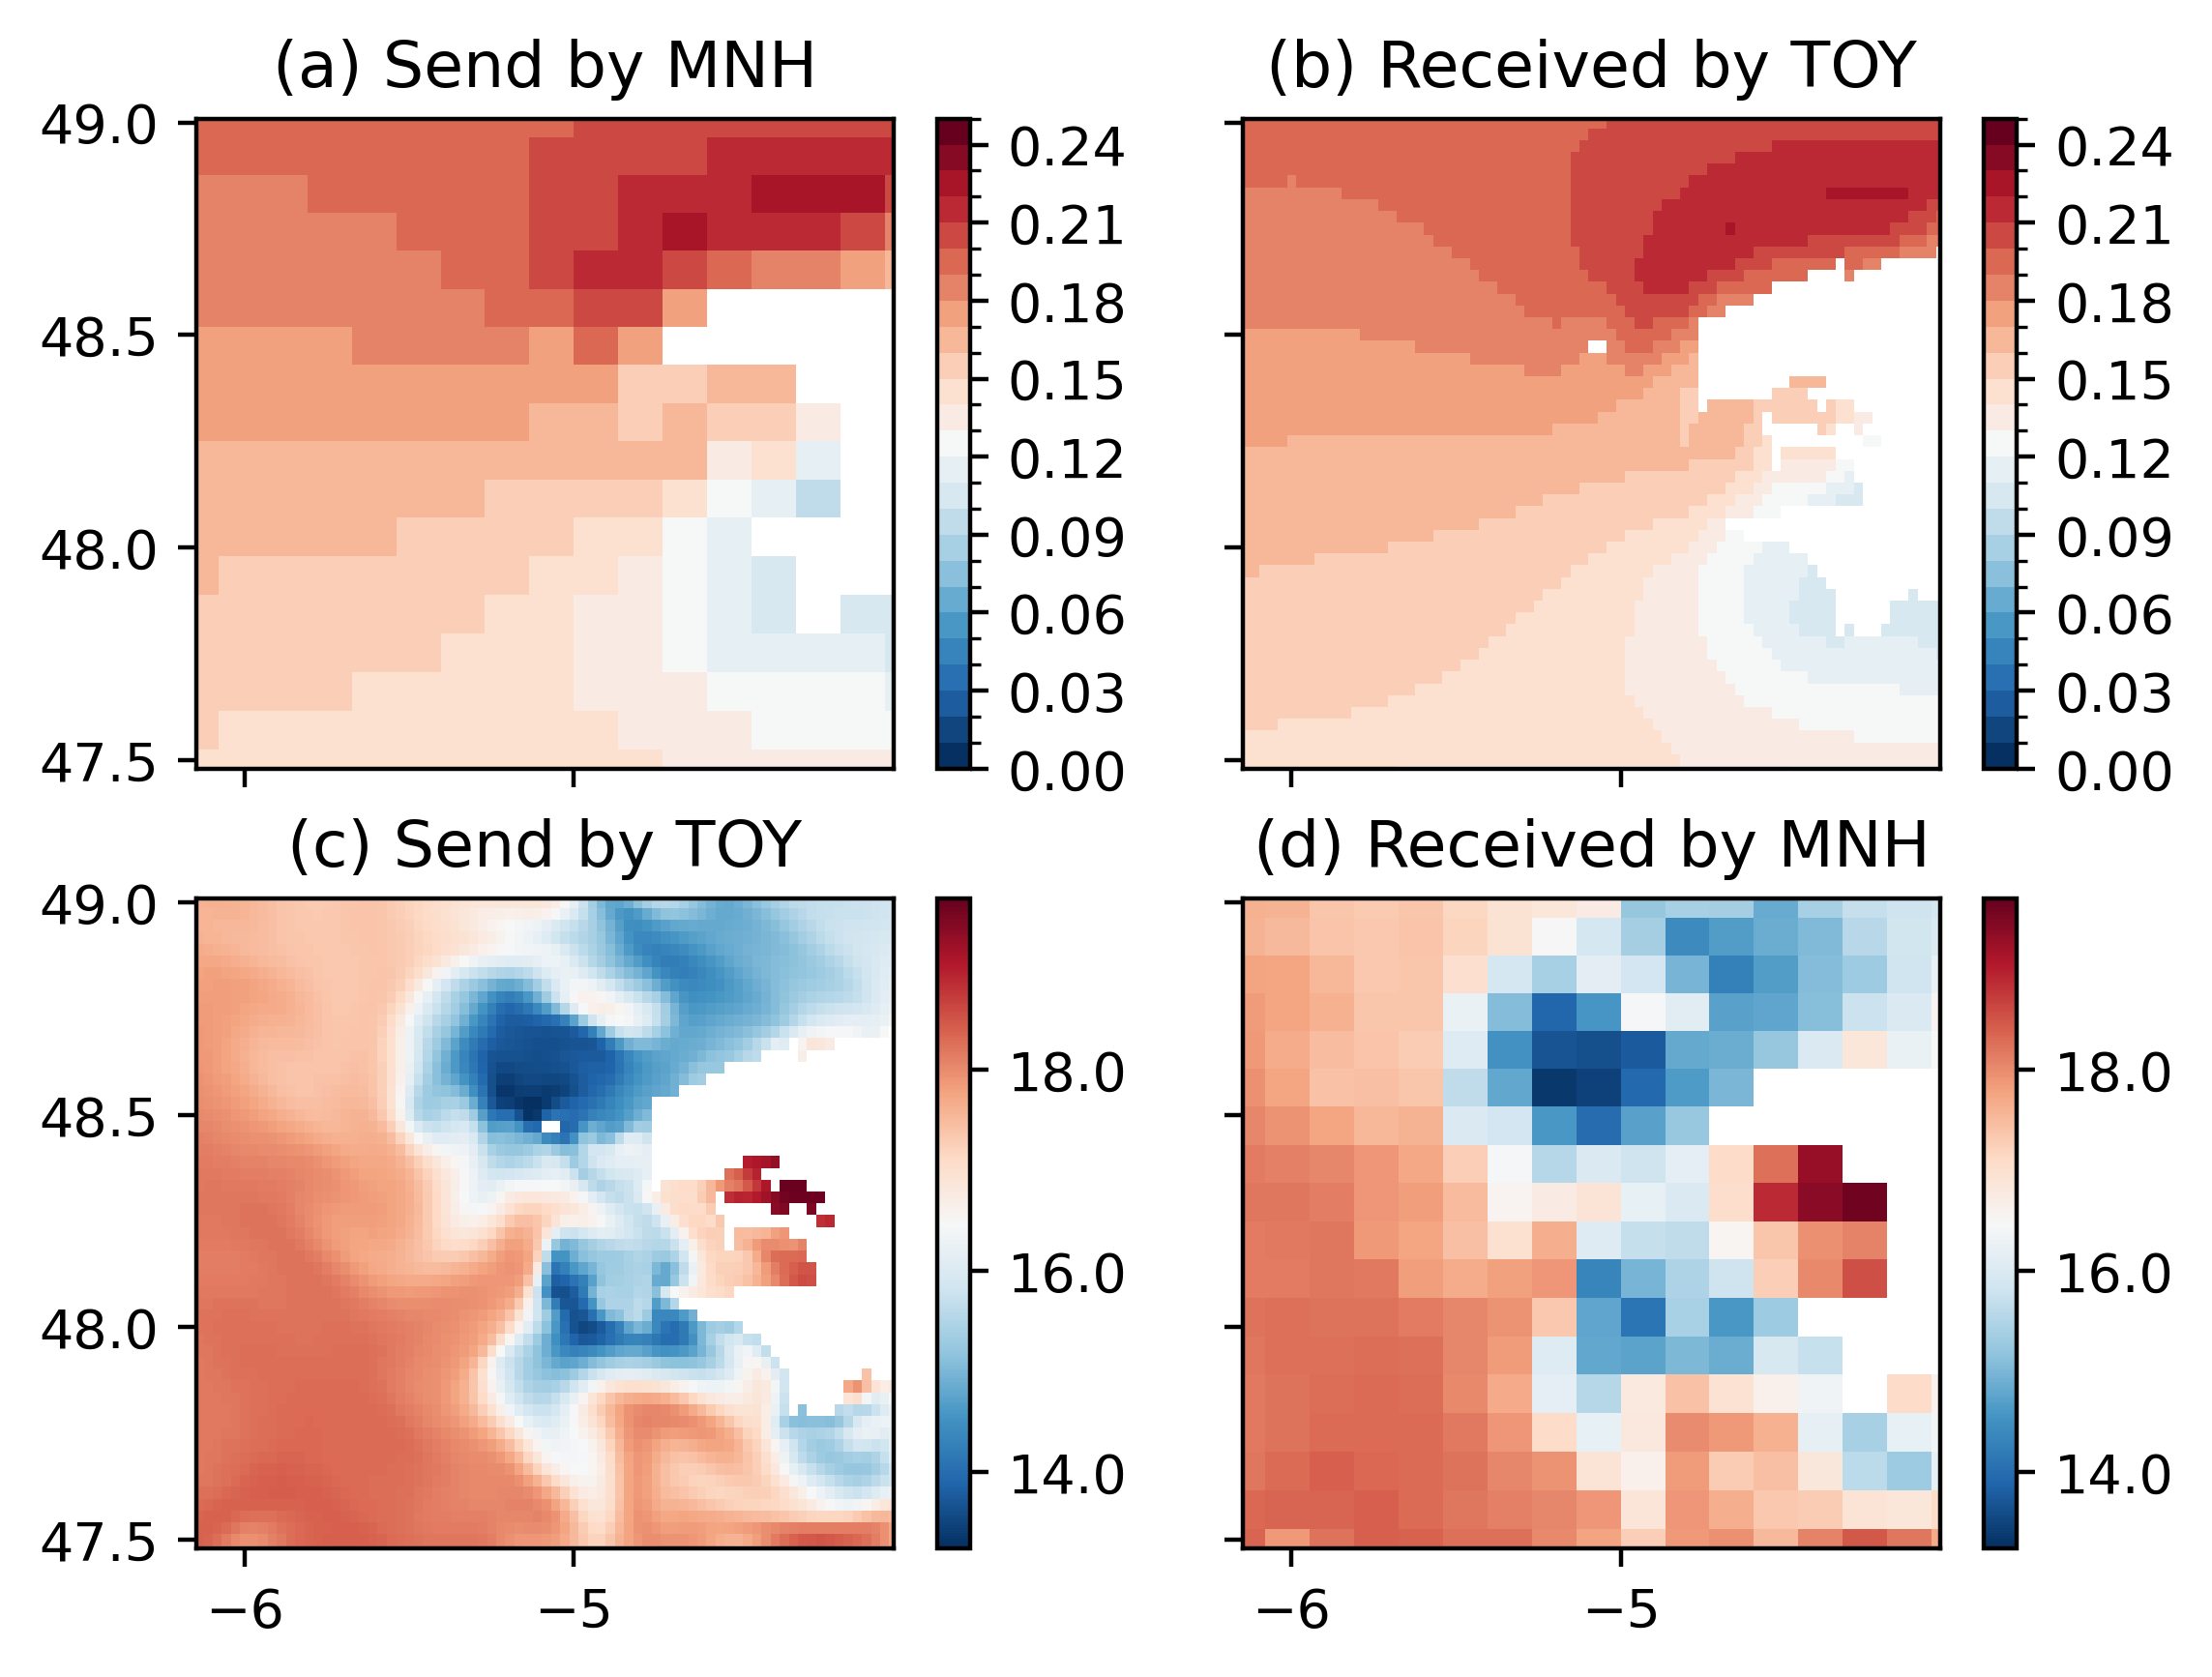
And you will have this figure :

The first line corresponds to the 10m u-wind speed sent from Meso-NH (a) to the toy model (b). The second line corresponds to the sea surface temperature sent by the toy model (c) to Meso-NH (d). Differences are due to the interpolation method (SCRIPR BILINEAR LR SCALAR LATLON 1 for first line, SCRIPR DISTWGT LR SCALAR LATLON 1 4 for second line).